Preparing iPad for Trade-in: What To Do Before Selling Your iPad
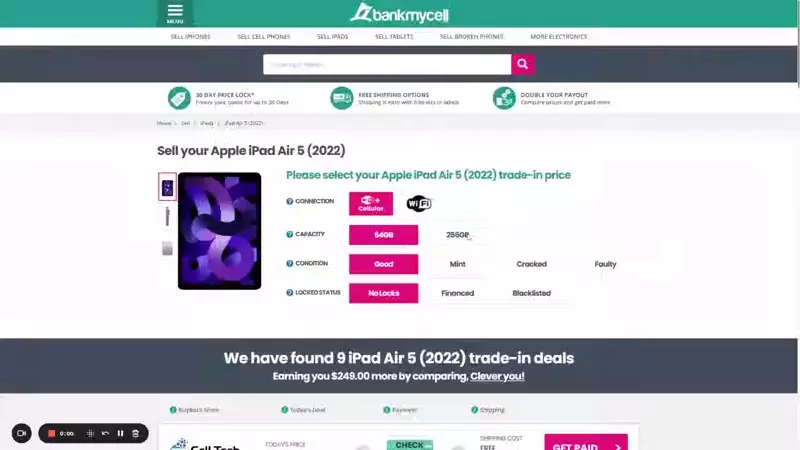
- Are you thinking of trading in your old device? Learn how to get the best deals (close to market rate!) through the BankMyCell website.
- Learn how to back up your data and remove them from your old device in preparing your iPad for a trade-in.
- Go through our helpful list of how to prepare your iOS device for its new owner.

SOLVED: Steps for Preparing Your iPad for Trade-In
Step 1: Backup Data
- Open Settings.
- Tap your account.
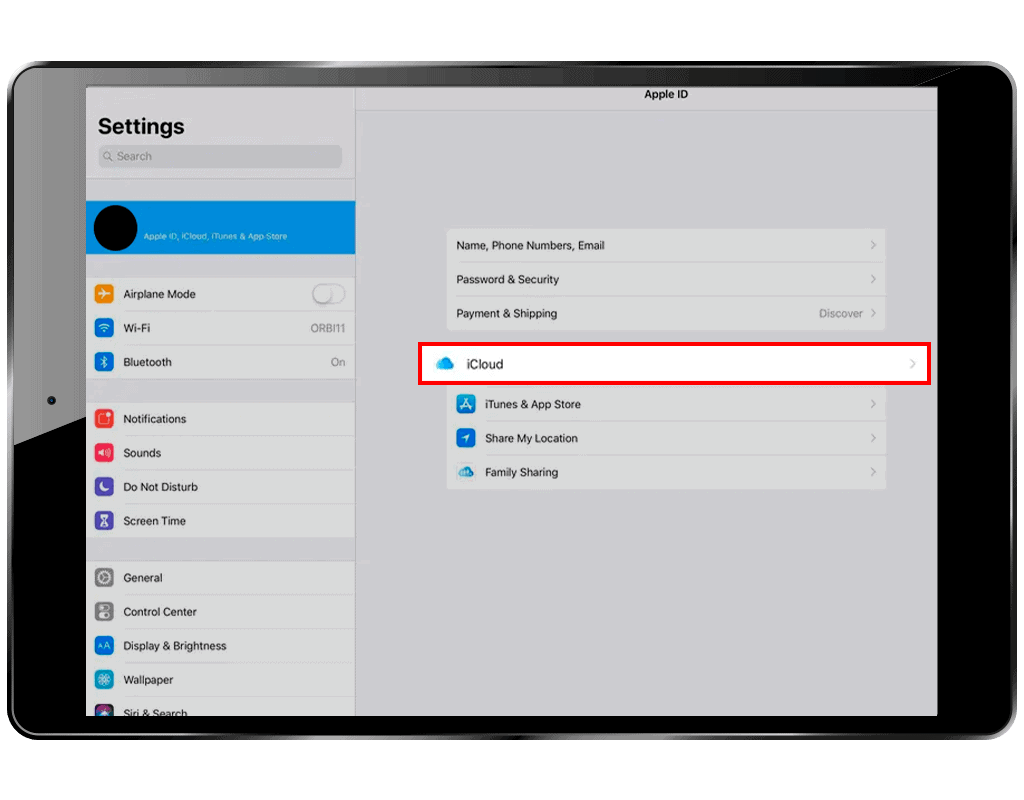
- Select iCloud.
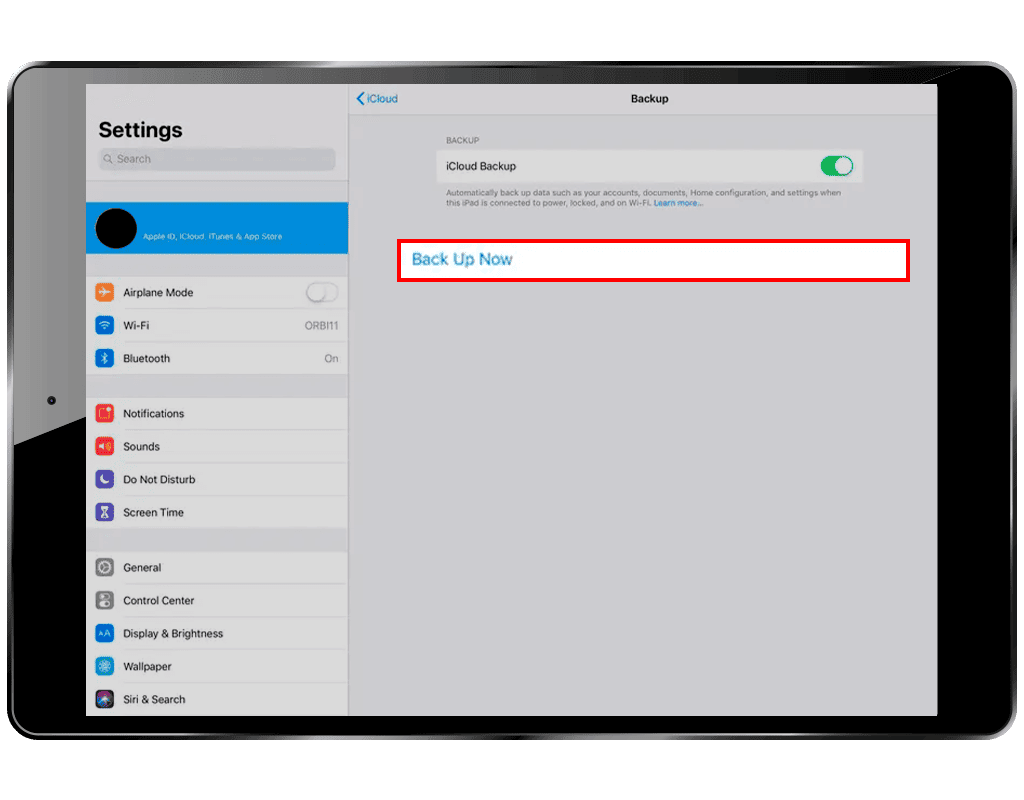
- Tap iCloud Backup.
- Tap Back Up Now.
Step 2: Reset to Factory Settings
Deactivate Activation Lock:
- Open Settings.
- Select your account.
- Tap Sign Out.
- Enter password.
- Tap Turn Off.
Factory Reset:
- Open Settings.
- Select General.
- Tap Transfer or Reset iPhone.
- Tap Erase All Content and Settings.
Step 3: Clean the Device
Remove all accessories and SIM cards, then gently wipe the screen and back of the iPad to ensure it’s in top condition for the next owner.
(Optional) Ensure Proper Shipping
- Turn off iPad.
- Wrap it in bubble wrap.
- Secure it in a box with cushioning materials to prevent damage during transport.
Step 1: Make Sure You Got the Best iPad Trade-in Deal
Dealing with trustworthy buy-back or trade-in sites can earn you up to $1,000 for your old iPad. BankMyCell will give you a price close to the market rate – giving you more to spend on a fresh and new device.
Here are reasons why trade-in sites might be your best option:
Find The Best Price in Seconds Here
- Carriers: Can only pay a maximum of $660 via account credit, not cash. This means you will lose around $340 compared to buy-back sites.
- Apple Trade-In: Only pays a maximum of $500 via an Apple Store gift card, losing you around $500.
- Amazon Trade-In: Payouts are limited to $680, losing you around $320.
- EcoATM: Offers the lowest trade-in price of $320 cash, losing you a whopping $680.
Once you secure the best deal, a reset process for your iPad is important for data security. You must ensure that your data is safely backed and wiped clean from your old device.
Step 1: Back Up Your Data - Copy Your Old iPad to Your New iPad
There are a lot of options for backing up your data. You can migrate it to iCloud or other Apple devices such as a Mac, or even a Windows PC.
The following are detailed instructions for each method. You can select which tool is available to you to securely back up your online accounts and other data.
Option 1: Using iCloud (On iPad):
- Open your Settings app and ensure your iOS device is connected to the Wi-Fi.
- Tap your account at the top of the page.
- It is the menu option that has your Apple account name and picture.
- On the Apple ID page, select iCloud.
- The iCloud page shows you the available space you have for iCloud.
- Tap iCloud Backup, and tap the iCloud Backup switch to turn on the feature.
- Turning on this feature automatically backs up your apps and data when your iPad is connected to power, locked, and on Wi-Fi.
- Tap Back-Up Now.
You need to maintain your connection to your Wi-Fi network to start a backup.
Back-Up Now displays the date and time of your most recent backup. If you receive a warning that you do not have enough iCloud storage space to finish the process, follow the onscreen instructions to purchase more storage. You may use Apple Pay for a subscription to higher storage capacity.
Option 2: Using Finder (On Mac/MacBook)
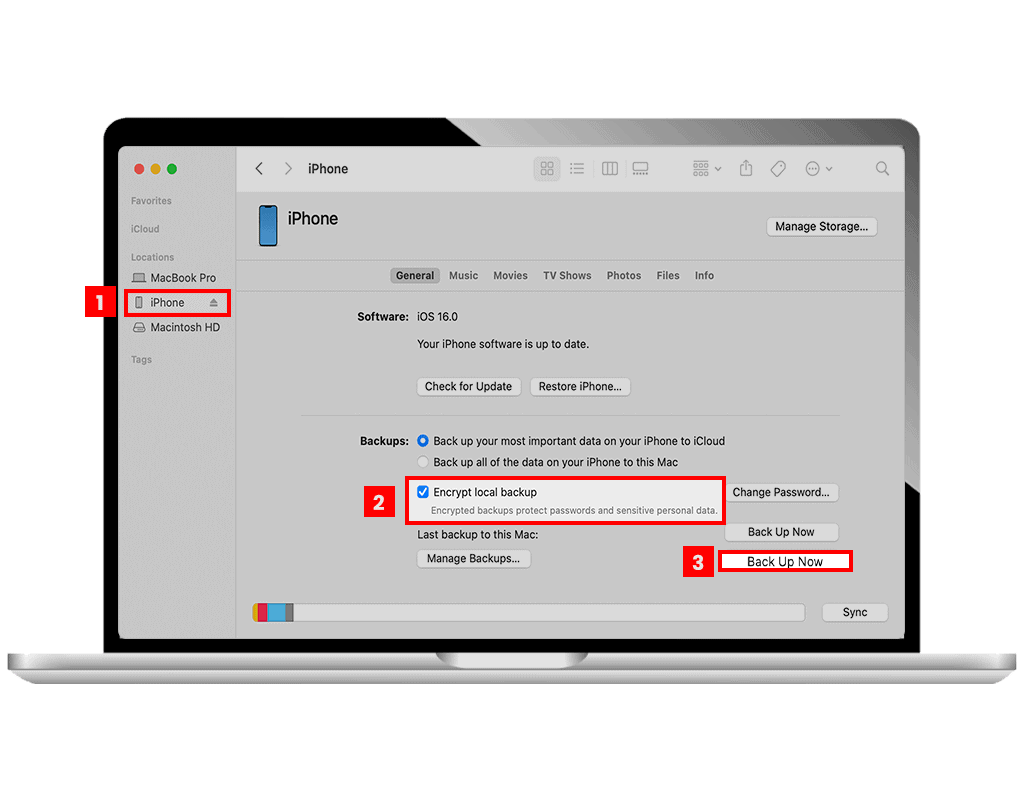
Backing up data on a Mac, such as the Macbook Pro or Macbook Air, is possible with the Finder or iTunes app.
- Open the Finder app on a Mac running macOS Catalina or later and use a USB cable to connect your Apple device to the computer.
- Follow the onscreen instructions. You might be prompted for your device passcode or to allow Trust This Computer on your iPad.
- On the Finder page, select your device under Locations.
- (OPTIONAL) Choose the Encrypt local backup checkbox from the Backups section, and create a password you will remember.You must encrypt your backup if you want to save Health and Activity data from your device or Apple Watch. Because you won’t be able to retrieve your backups without it, save your password somewhere safe, just like you would your Apple ID and password for other devices.
- Click Back Up Now. You can check to see if the data is safely backed when the process is completed. You should be able to see the date and time of your most recent backup.
Option 3: Using iTunes (On Mac)
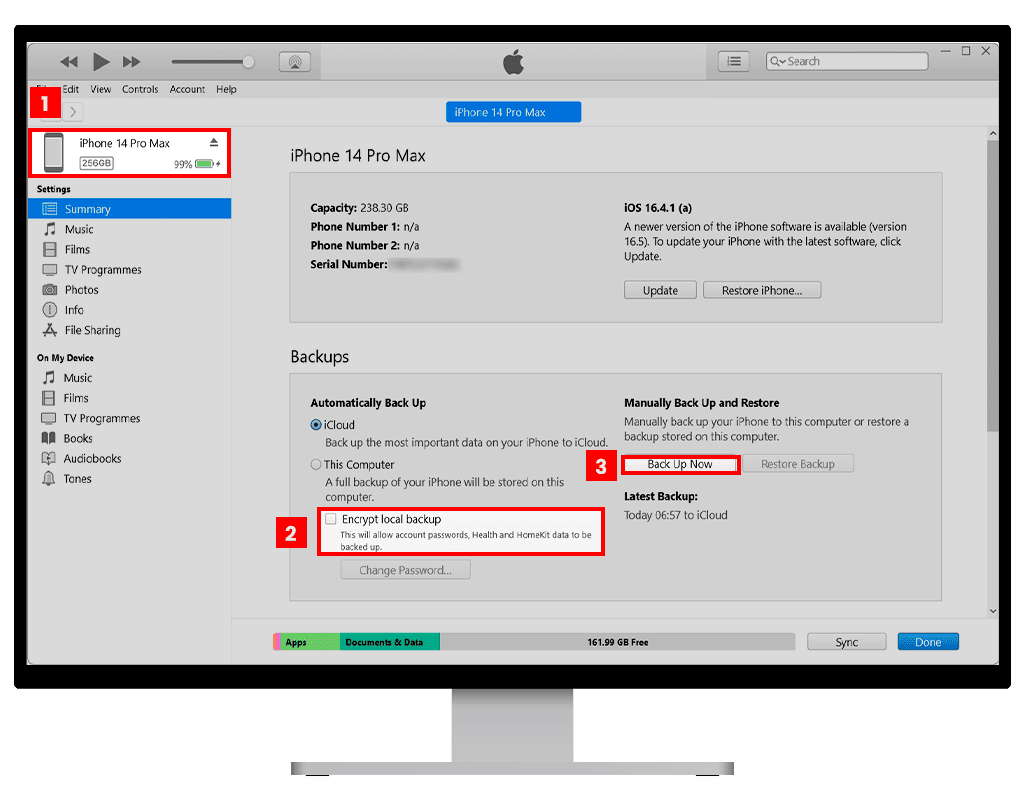
- Open the iTunes app on a Mac running macOS Mojave or earlier and use a USB cable to connect your Apple device to the computer.
- Follow the onscreen instructions. You might be prompted for a passcode or to allow Trust This Computer on your iPad.
- Select your device on your computer.
- (optional) Choose the Encrypt local backup checkbox from the Backups section, and create a password you will remember.
You must encrypt your backup if you want to save Health and Activity data from your device or Apple Watch.
Because you will be unable to retrieve your backups without it, save your password somewhere safe, just like you would your Apple ID and password for other devices. - Click Back Up Now.
When the process is finished, you can check to see if the process was successful. You’ll be able to see the date and time of your most recent backup.
Option 4: Using iTunes (On Windows)
- Open iTunes on your Windows PC.
- You might need to download iTunes if you still do not have it on your computer.
- Use a USB or USB-C cable or a Wi-Fi connection to connect your Apple device to your computer.
- Follow the onscreen instructions. You might be prompted for your device passcode or to allow Trust This Computer on your iPad.
- On the iTunes window, select your device by clicking the Device button.
- Under the device’s settings on iTunes, click Summary.
- (optional) Choose the Encrypt local backup checkbox from the Backups section, and create a password you will remember.
You must encrypt your backup if you want to save Health and Activity data from your device or Apple Watch. - Click Back Up Now. When the process is finished, you can check to see if the process was successful. You’ll be able to see the date and time of your most recent backup.
Option 5: Transfer Backup to New iPad (iPad to iPad)
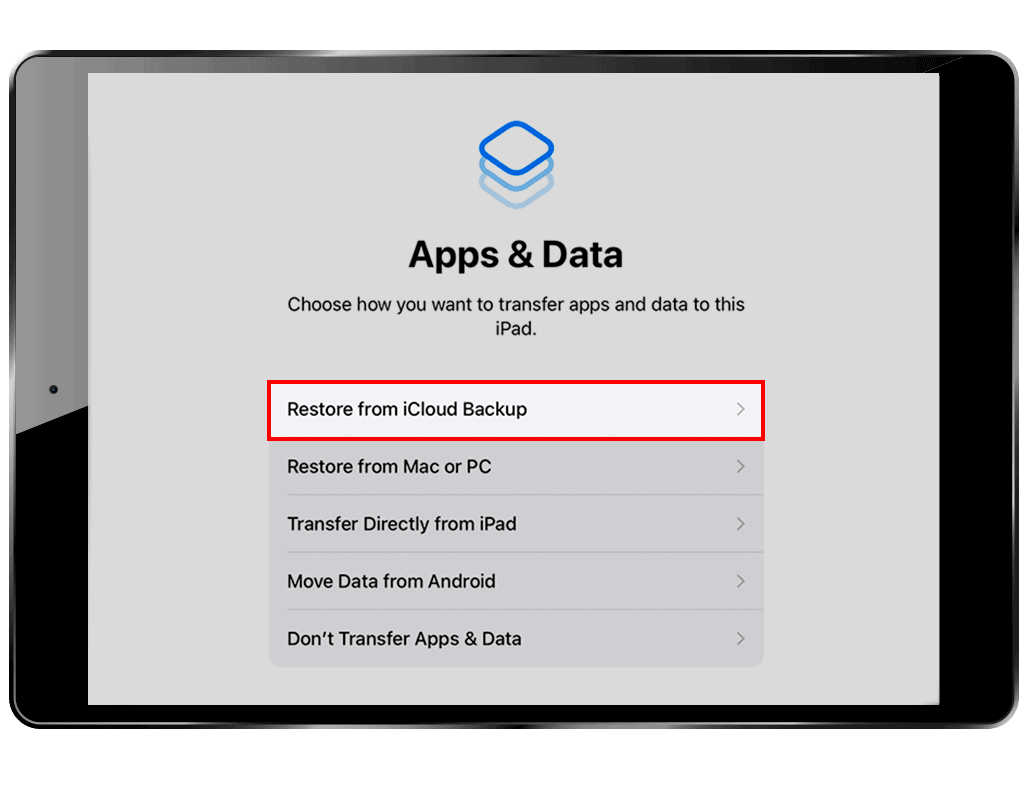
If you have a new iPad ready where you want to transfer your old iPad’s backup, you can use iCloud, iTunes, or Finder to transfer your data to your new device.
- For iCloud, you can choose to manually set up your new iPad and choose the Restore from iCloud Backup option. This will require you to log in with your Apple ID and password.
- For iTunes or Finder, connect the new iPad to the Mac or PC with a USB cable and use the Restore Backup feature.
Step 2: Reset Your Device to Factory Settings & Remove Cloud Accounts
After your backup, find the steps below to wipe an iPad before selling. This restores your iPad to a factory reset, or its original state from when it was first purchased. This ensures that the new owner cannot access your personal information and account settings.
Apple introduced an Activation Lock security feature that prevents users from resetting a device without an iCloud access. You will need to remove the Activation Lock before you can delete your data from your iPad.
A. How to remove Activation Lock from the device
- Open the Settings app.
- Tap your account at the top of the page.
- It is an option that has your Apple account name and picture.
- On the Apple ID page, scroll through the bottom of the menu and tap Sign Out.
- Enter your Apple ID password, and tap Turn Off.
- Tap Sign Out and then tap Sign out again to confirm.
B. To erase your personal information, data, and account settings:
- On Settings, tap General.
- Tap Transfer or Reset iPad at the bottom of the page.
- Press Erase All Content and Settings from the menu.
- Input your Apple ID and password if asked.
- Tap Erase.
What to do if You've Already Given the iOS Device Away (Before Wiping Your Data)
It is ideal that you: (1) back up your files, (2) transfer data to your new iPad or tablet, and then (3) remove your personal information from your old device before selling or trading it in. But if you were unable to complete this process, you can still try the following options to secure your data:
- Request the new owner to erase all content and settings of the iPad.
- Sign in to iCloud.com/find on a browser or the Find My app on another Apple device. Select the old device, and click Erase. Remove the gadget from your account after you erased its contents.
- Change your Apple ID password if you can’t follow either one of the previous methods.
- Changing your Apple ID password won’t erase any personal data on your old smartphone. Still, it will prevent the new owner from erasing your data from iCloud.
-
Deregister iMessage if you’re switching to a non-Apple phone
Step 3: Remove Accessories, Memory, and SIM Cards
Clean Your Device
You should also carefully remove the accessories attached to the iPad to restore the device to a more pristine condition.
It is considerate to properly clean an iPad before it reaches its new owner. The same rule applies when you sell an Apple Watch, old iPhone, iPod touch, Macbook Pro, and other old devices. It’s best to avoid damaging the device and the screen so that a new owner gets the most out of the item. But you can use the following checklist when cleaning the iPad.
- Remove the SIM card using the original ejecting tool that came with your iPad box or a paper clip. Try pressing the ejector’s sharp end into the pinhole of the SIM tray so it pops out and remove the card.
- Remove any screen protectors, vehicle mounts, cases, or other accessories you used to customize your iPad.
- Wipe the screen gently with a soft microfibre cloth to remove dirt and oil residue. Remember to also clean the back of your iPad.
- Remove any screen protector stains and grime around the borders.
(Bonus tips!) How to Prepare Your iPad for Shipping
Below is a checklist of things you can prepare to ensure that the next owner of your iPad enjoys a seamless experience with their new device.
Make Sure It’s Clean for Activation (WiFi + Cellular ONLY)
Wi-Fi + Cellular iPad models have cellular capabilities. But some carriers have strict rules about allowing new owners to activate pre-owned iPads on their cellular networks. You must ensure that your device is free from contractual bonds so that the new owner doesn’t meet any problems with carrier activation.
Below are some details on carrier rules about pre-owned devices.
- When it comes to selling an old iPad, AT&T is most likely the easiest carrier to work with. AT&T allows anyone to use pre-owned units on their networkas long as the unit has not been reported stolen.
- Your old T-Mobile iPad must be completely paid off and free from contractual obligations before your buyer can use it. T-Mobile has an IMEI tool that can tell if your device is ready.
- Verizon also requires an old iPad to be paid off and free from contractual obligations before it can be activated on a new account.
- Before you trade your Sprint iPad, make sure it’s been paid off and free of contractual obligations. You should deactivate your Sprint account as well before it can be used. Check the iPad’s IMEI using the network’s tool to ensure that it meets all requirements.
Take Pictures of Your Device
Before sending the iPad to the buyer, it is important to attain proof of its latest appearance. Your photos can help serve as evidence should damage happen during delivery.
- Take a photo of the iPad while it’s turned on and when it’s turned off, showing the iOS welcome screen.
- Take a picture of your iPad from all angles, including the top, bottom, front, back, and sides, with the screen turned on.
Turn Off Your Old iPad and Prepare Your iPad for Safe Shipping
To make sure that your iPad arrives safely to your recipient, you should guarantee safe shipping and packaging of the device. Protecting the device from any damage that could occur during transport, handling, and storage is important.
- Disconnect your iPad from your Wi-Fi, then turn it off for shipping.
- Place the iPad in a box so it will be easier to find and unpack.
- Cushioning materials should be added so that the original box does not move.
- Wrap the iPad in bubble wrap, ensuring that no exposed areas are present. Use traditional bubble wrap and packaging tape to secure the device.
Your device should now be ready for delivery!
For a comparison of the best trade-in deals for your iPad, visit BankMyCell.com!
FAQs
What happens when you trade in an iPad?
After shipping your iPad for trade-in, the store will inspect it to see if the condition and specs match your description. After that, they will pay you the amount you agreed upon.
The traded-in iPad will be restored and resold or sustainably recycled depending on its condition.
