How to Use AirDrop: Turn On/Off and Manage in Apple Devices
- Learn how to turn on and off AirDrop on iPhone, iPad, and MacBook.
- Utilize and manage AirDrop on the same and different Apple devices.
- Find out how to fix your Airdrop that won’t turn on, so you can share and receive files quickly.
SOLVED: Steps to Enable, Disable, and Manage AirDrop on iOS Devices
Enable/Disable AirDrop on iPhone
To Turn On:
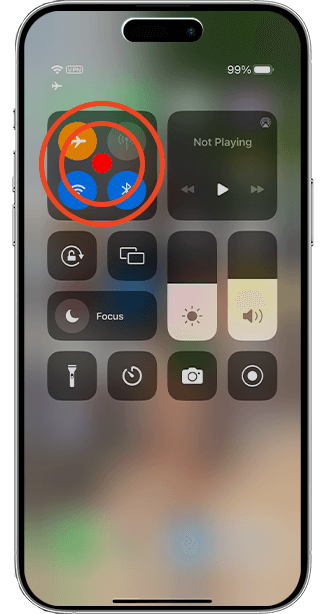
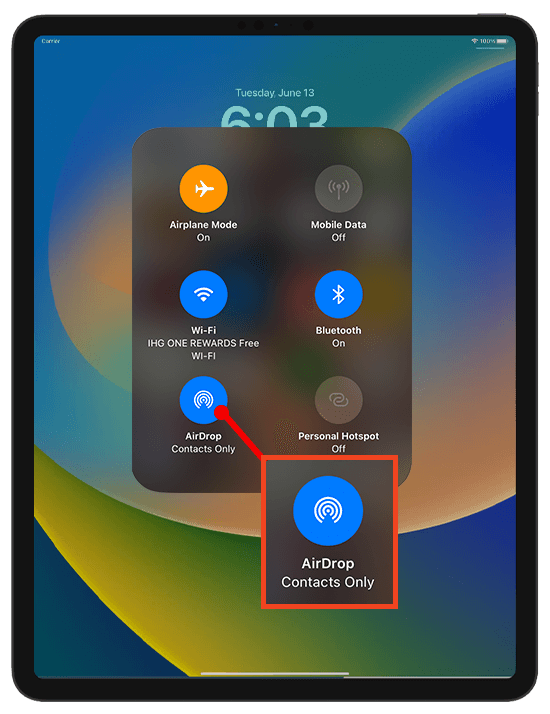
- Swipe to open Control Center.
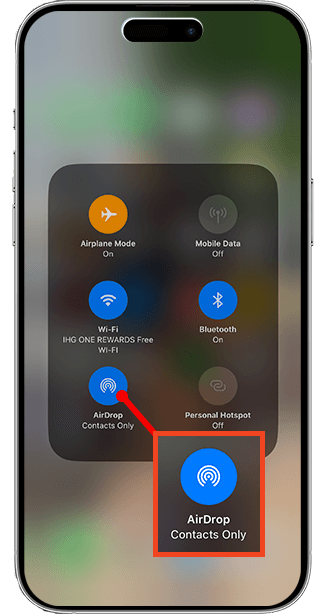
- Tap AirDrop.
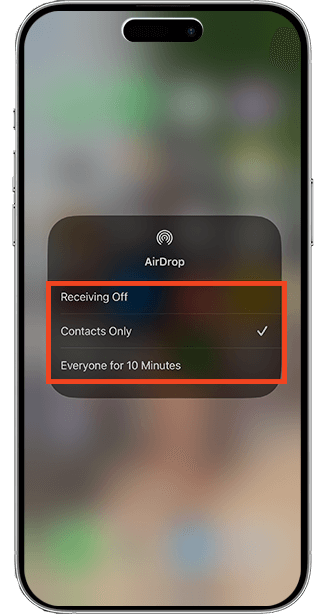
- Choose Contacts Only or Everyone.
To Turn Off:
- Open Control Center.
- Tap AirDrop.
- Select Receiving Off.
Enable/Disable AirDrop on iPad
To Turn On:
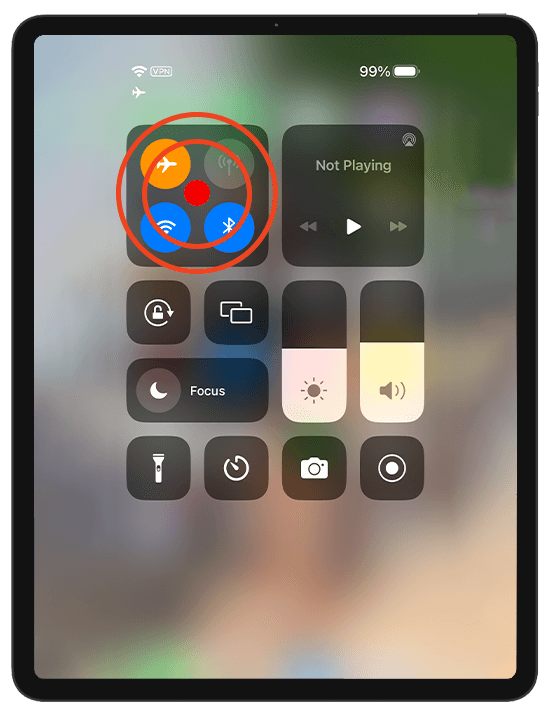
- Swipe down from the top right for Control Center.
- Tap AirDrop OR go to Settings > General > AirDrop.
- Choose Contacts Only or Everyone.
To Turn Off:
- Open Control Center or Settings.
- Tap AirDrop.
- Select Receiving Off.
Enable/Disable AirDrop on Mac
Via Control Center
To Turn On:
- Click Control Center in the top menu.
- Select AirDrop.
- Set to Contacts Only or Everyone.
To Turn Off:
- Click Control Center.
- Select AirDrop.
- Set discovery to No One.
On macOS Lion X or Later
To Turn On:
- Click Go tab.
- Select AirDrop.
- Enable Bluetooth.
- Choose discovery setting.
To Turn Off:
- Access AirDrop through Go tab.
- Set Allow Me To Be Discovered By to No One.
On Older Mac Models
To Turn On:
- Open Finder.
- Go to AirDrop.
- Set discovery to Contacts Only or Everyone.
To Turn Off:
- Access AirDrop via Finder.
- Set Allow Me To Be Discovered By to No One.
How to Send Files Between Devices
- Enable AirDrop.
- Open Photos.
- Select the files you want to send.
- Tap Share > Tap AirDrop > Select Receiver’s device.
- Receiver taps Accept.
How to Troubleshoot AirDrop Issues
Verify device compatibility with AirDrop. AirDrop supports these devices:
- iPhones and iPads on iOS 7+
- Macs from 2012 on OS X Yosemite+.
Turn off personal hotspot:
- Settings > Personal Hotspot
Fix for Mac unable to receive AirDrop files:
- Open Apple Menu > Select System Preferences.
- Go to Security & Privacy > Select Firewall Tab.
- Click the Lock > Enter admin password.
- Select Firewall Options > Uncheck Block All Incoming Connections.
How to Turn On and Off Your AirDrop
It is simple to turn on your AirDrop. Simply ensure that Wi-Fi and Bluetooth are enabled on both the sending and receiving devices before attempting to connect them. In addition, your hotspot must be turned off to avoid disconnection.
How to Turn on AirDrop on Your iPhone
- Swipe down from your device’s upper-right corner or up from the bottom to access the Control Center.
- Tap the tray containing the Airplane Mode, Wi-Fi, Bluetooth, and Personal Hotspot icons.
- Tap the AirDrop button in the expanded tray.
- Choose Contacts Only or Everyone, whichever you prefer.
- The AirDrop button should now be blue, indicating that it is active.
On the 4th step, note that you will only receive files from people on your Contacts list if you select Contacts Only, while the Everyone option means any nearby devices can transfer files to your device.
How to Turn On AirDrop on Your iPad
How to Turn On AirDrop on iPad on Home Screen
- Swipe down from the top right corner of the home screen to open the Control Center.
- Select the AirDrop icon.
How to Turn On AirDrop on iPad in settings
- Open Settings app.
- From the left menu, select General.
- Select the AirDrop icon. Receiving Off, Contacts Only, and Everyone will appear as AirDrop options.
- Tap Contacts Only or Everyone to enable AirDrop.
How to Turn On AirDrop on Your Mac
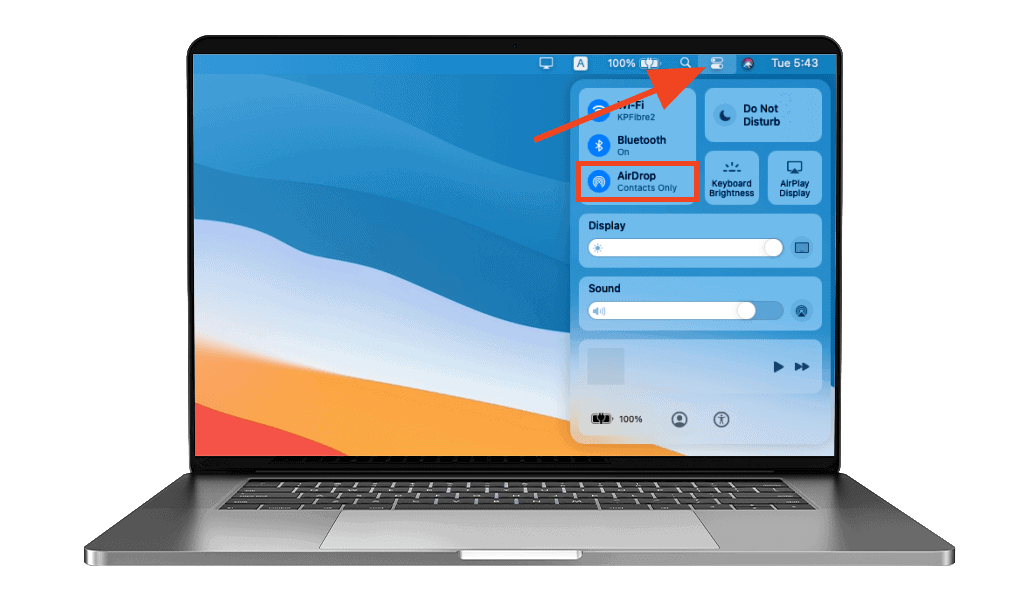
How to Turn Your AirDrop On Through macOS Control Center (For newer macs)
- In the top menu bar, select the Control Center icon.
- Select AirDrop and turn it on.
- Set your AirDrop Settings to Contacts Only or Everyone.
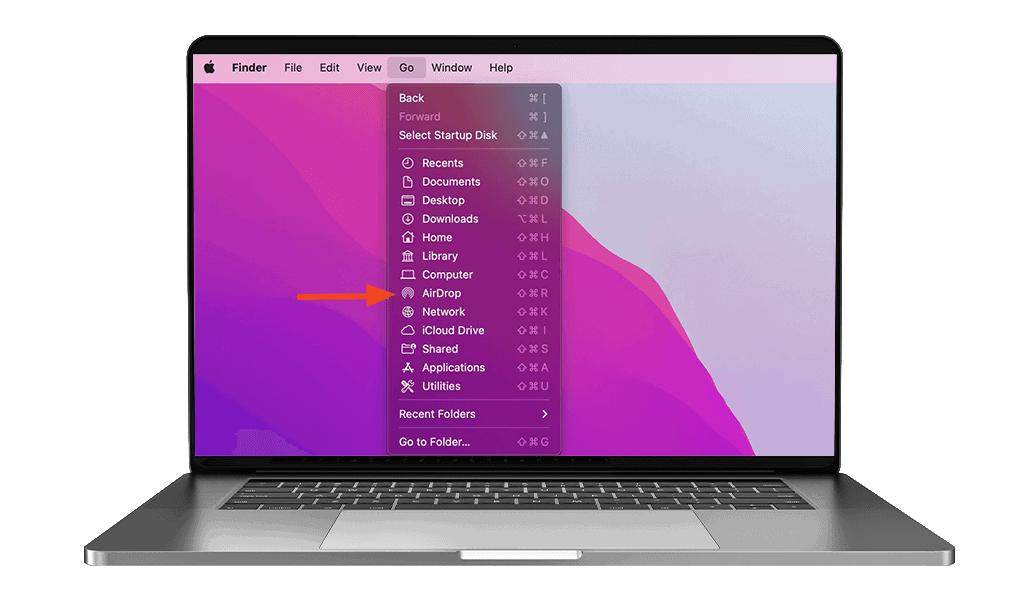
How to Turn Your AirDrop On Through the Go tab (for macOS lion x or later versions)
- Right-click on your home screen for the menu bar to appear.
- At the top of your Mac, click the Go tab.
- Select AirDrop from the drop-down menu.
- On the screen, you’ll see the option to enable Bluetooth. Simply click on it.
- Once Bluetooth is enabled, click Allow Me To Be Discovered By and select who will receive AirDrop files.
How to Turn Your AirDrop On Through Finder (For Older Mac)
- Launch a new Finder window.
- Navigate to the AirDrop folder.
- Select Allow Me To Be Discovered By from the small drop-down menu that appears.
- Choose between Contacts Only and Everyone.
How to Turn Off Your AirDrop
If you’re done receiving or sending files to other devices, you may wonder how to turn AirDrop off now. Simply follow the steps outlined above for the device you’re using.
Choose Receiving Off on the last step for iPad and iPhone. As for Mac, it should be No One on Allow Me to Discovered By setting.
How to Use AirDrop on the Same Device
How does AirDrop work? AirDrop makes file sharing simple. Ensure that the other device that will send or receive files is nearby. Both devices must have their Wi-Fi and Bluetooth turned on and the Personal Hotspot off.
The receiving device must enable AirDrop first and must be in your Contacts list if its settings are in Contacts Only to share files smoothly. If not, the receiver must set up its AirDrop receiving setting for Everyone.
Keep reading to know how you can share or receive files between the same Apple device.
AirDrop on iPhone to iPhone
Send Photos or Videos
- Enable AirDrop through Control Center.
- Launch the Photos app and choose the photos or videos you want to send.
- Select the Share button.
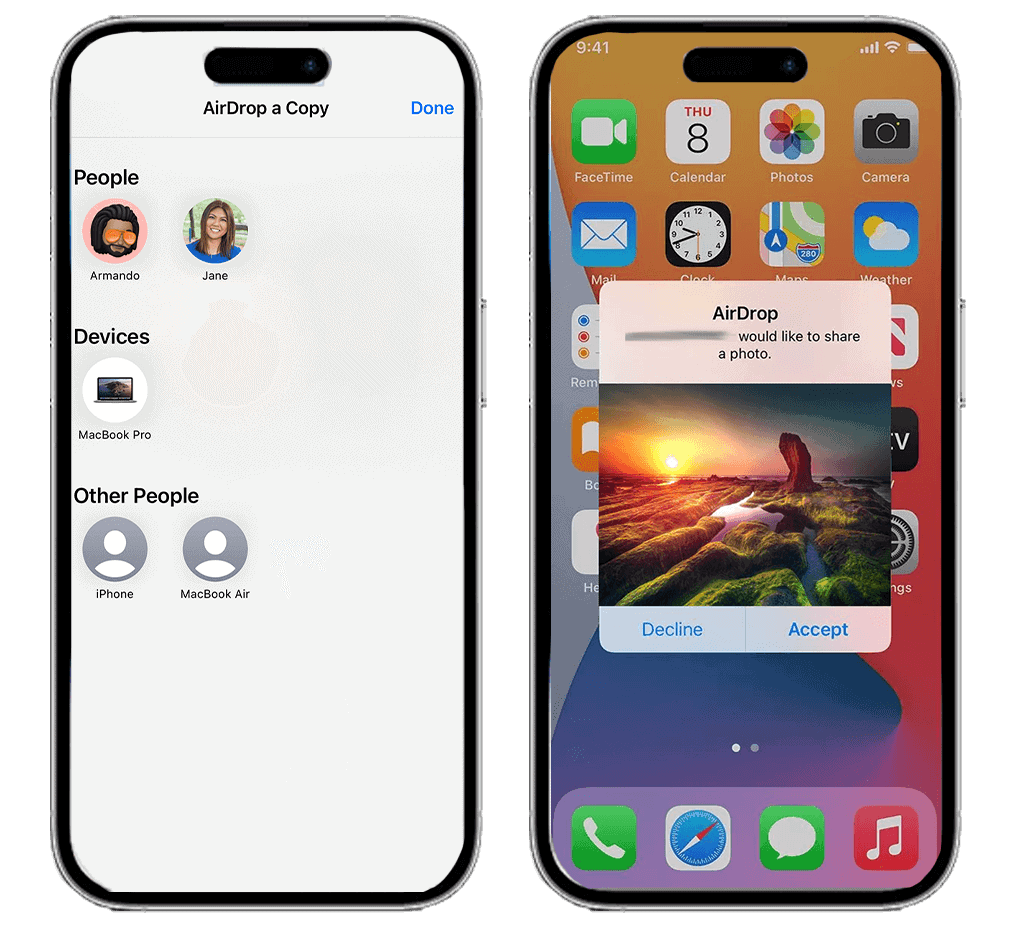
- Tap AirDrop and the AirDrop name of the receiving device.
- Select Accept to begin the file sharing.
Send Contacts
- Open AirDrop on the Control Center.
- Navigate to the Contacts app.
- Choose the contact information you want to share.
- Tap Share Contact and the receiving device.
- Select Accept to share the contact.
Receive Files
A popup will appear on your screen if someone tries to send files to you. You can tap Accept to accept files from the device you recognize. If not, tap Decline to restart or reject the sender, who may accidentally tap your AirDrop name. It can happen if your setting in AirDrop is set to Everyone.
The files you will receive will go to their respective apps. Photos, for example, will be moved to the Photos app, files open on the option you choose on the popup, and so on.
AirDrop on iPad to iPad
Send Files
- Go to the file and select it.
- Tap the Share icon.
- Select Airdrop on the share menu.
- Choose the profile picture of the receiver.
Receive Files
Receiving files from an iPad is the same way as using an iPhone. A popup will appear if someone attempts to send you files. It’s up to you if you want to Accept or Decline it.
AirDrop on a Mac to Mac
Please note that AirDrop requires a Mac running OS X Yosemite or later to work between two Macs.
Send photos or Videos
- Open AirDrop on Mac through the Finder Window, Go tab, or MacOS Control Center.
- Go to Photos App and choose the photos you want to share.
- Click the Share button.
- Select AirDrop from the dropdown menu.
- Choose the Mac that will receive the images or videos.
Send Files
- Open Finder and click the Go tab.
- Select AirDrop from the dropdown.
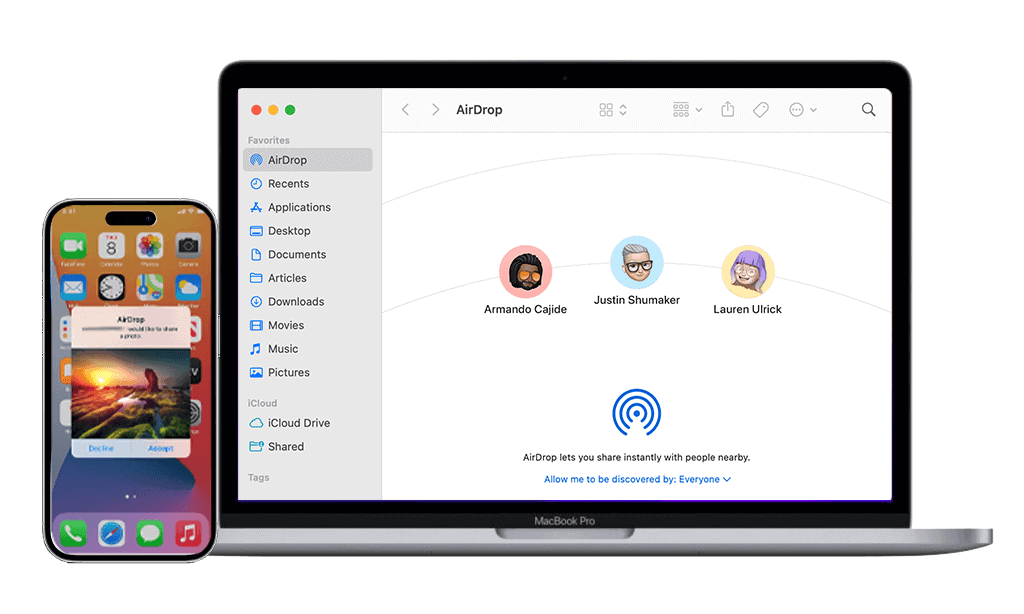
- Drag and drop the files into the circle.
Receive Files
You will get a notification or a message in the AirDrop window when someone tries to send you files. Accept and save the file to your Downloads folder.
How to Use AirDrop on the Different Devices
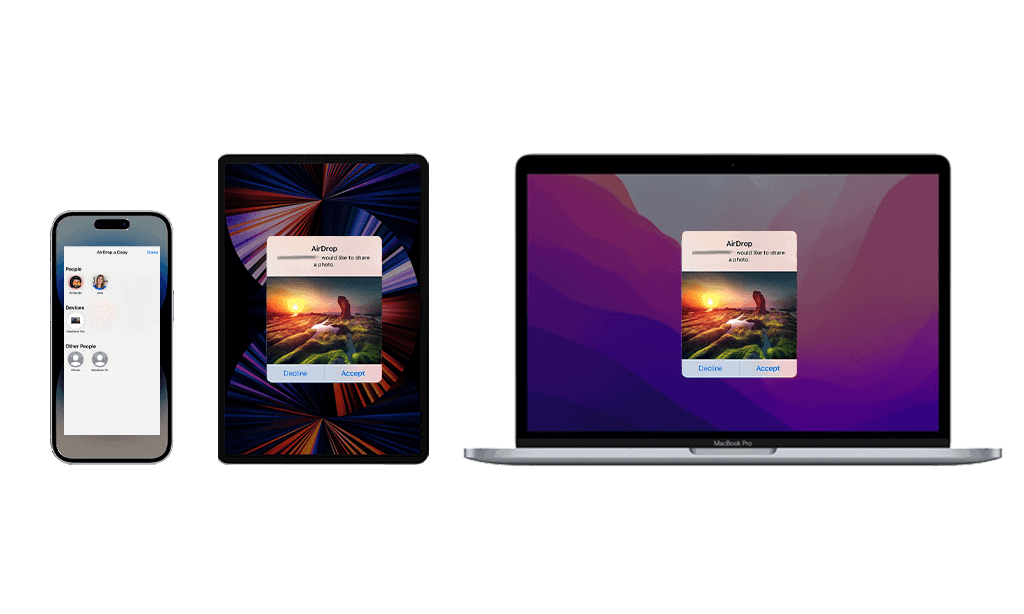
Apple makes AirDrop seamless on other Apple devices. They make it possible as well to share files between different devices. Here’s how you can share files from iPhone to Mac and the other way around.
iPhone to Mac
- First, turn on AirDrop on iPhone and on Mac. Check it is ready to be discovered.
- Open the file you want to send from your iPhone to Mac.
- If you’re going to share many photos or videos, tap Select and choose all the images and videos needed.
- Select the Share button and AirDrop when the applications tray appears.
- Choose the AirDrop name of the Mac.
- A notification will appear on the Mac, Accept the shared files.
Mac to iPhone
- Go to the folder you want to share.
- Right-click the file and hover over Share.
- Choose AirDrop from the dropdown menu.
- Click the name of the receiving device.
If you own both devices, log in to iCloud using the same Apple ID for quick sharing, as the files are accepted and saved automatically.
Why Won't My AirDrop Turn On?
Check to see if your Apple device supports AirDrop. It is available on iPhones and iPads running iOS 7 or later, as well as Macs and MacBooks from 2012 or later that run at least OS X Yosemite.
Then, check if your Personal Hotspot is off by navigating to Settings and selecting Personal Hotspot. It must be turned off for AirDrop to work.
If your Mac is unable to receive any AirDrop files, follow these steps:
- Launch Apple Menu and go to System Preferences.
- Select Security & Privacy, then Firewall Tab.
- Click the Lock and type in your administrator password when prompted.
- Select Firewall Options and uncheck Block All Incoming Connections.
Frequently Asked Questions
How can I check if AirDrop is enabled?
You can easily determine if AirDrop is turned on by going to Settings, selecting General, and tapping AirDrop. Ensure it’s set to Contacts Only or Everyone to activate AirDrop.
What should I do if I can't activate AirDrop?
If AirDrop won’t activate, ensure Wi-Fi and Bluetooth are enabled. Check if any AirDrop restrictions are set under Screen Time settings. Also, ensure both devices are within range for a successful connection.
Why am I not showing up on AirDrop?
To appear on AirDrop, your device needs to be awake and unlocked. Double-check that AirDrop is set to Everyone or Contacts Only in the control center. If you’re still not visible, review any network settings or restrictions affecting visibility.
